Maker Education Camp: Circuit Crafts
This is my third summer offering maker education summer camps as part of a bigger program at a local school. During mornings (9 to 12 with a half hour recess), campers, grades Kindergarten through 6th grade, can choose from one of four enrichment classes: art, drama, games, foreign languages, computers, and in my case, maker camps. During the afternoons, all campers get together for typical camp activities – fun and games, field trips, water sports, silly competitions. Each camp lasts a week. This summer I am offering: Cardboard Creations, Circuit Crafts, Toy Making and Hacking, and Robotics and Coding.
I often discuss the need to implement maker education programs with minimal cost materials and ones that offer the potential to tap into diverse learners and their diverse interests:
3d Printers, Ardinos, litteBits, Makey-Makeys, GoSpheros, Lillipads, . . . oh my! These technologies are seductive especially seeing all the press they get on social media, blogs, and Kickstarter. Given all of the media coverage, an educator new to Maker Education may get the perception that it is all about this kind of high tech stuff. For less affluent schools or after-school programs, it may seem that maker education is out of their reach given budgetary restraints. A maker education program can be fully implemented with minimal cost supplies. Cardboard boxes, recycled materials such as water bottles, detergent bottles, and other plastic throwaways, tape, glue guns, scissors/knives, and markers in conjunction with learners’ imaginations, creativity, and innovative ideas can be the stuff that makerspaces are made of (Making MAKEing more inclusive).
Many of the discussions about and actions related to integrating maker education into educational environments center around the use of new technologies such computer components (Raspberry Pis, Arduinos), interactive robots for kids (Dash and Dot, Ozobots, Spheros), and 3D printers. These technologies are lots of fun and I facilitate Robotics and Computer Science with my gifted students and at one of my summer camps (noting that I purchased the robots myself). The learners engaged in these high tech learning activities with high excitement and motivation. Such high excitement, engagement and motivation, though, were also seen at my low tech/low cost maker education camps: LED crafts, Toy Hacking and Making, and Cardboard Creations. A recent NPR article discussed several challenges for maker education. One of them was related to equity issues, providing maker education for all students regardless of income level:
A big challenge for maker education: making it not just the purview mostly of middle- and upper-middle-class white kids and white teachers whose schools can afford laser cutters, drones or 3-D printers (3 Challenges As Hands-On, DIY Culture Moves Into Schools).
This post lists the materials I used for the Circuit Crafts and descriptions of the activities.
Materials and Costs:
This camp did have some costs associated with it but I believe that given the wide range of activities offered, the costs were justified. The following is my materials list and costs. FYI – I actually purchased most of these materials cheaper via ebay.
- Snap Circuits Pro (2 at $60 each – $120)
- Circuit Maze (2 @ $23 each – $46)
- Circuit Kits (3 at $14 https://www.amazon.com/Basic-Circuit-Kit-Batteries-Holders/dp/B00FKCVFPW – $42)
- Squishy Circuits
- Playdoh (two 10 packs at $8.00 each – $16)
- modeling clay (24 color pack @ $14)
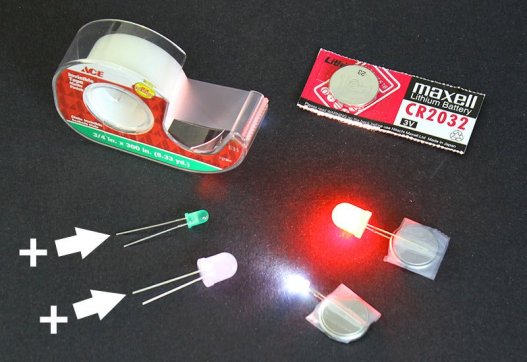
- 5 mm LED’s – used for several projects (500 mixed color from ebay – $14)
- 9V Batteries (10 2-packs from Dollar Store – $10)
- battery terminals with wires (20 – $10)
- Gami-Bots
- business cards ($5)
- coin pager motors (50 from ebay – $25; I got extras as sometimes the wires pull out and sometimes the campers want to make more than one)
- coin batteries – used for several projects (200 from ebay – $20)
- Wiggle or Art Bots
- Wiggle Bot Kits (https://teachergeek.com/collections/science-class/products/wiggle-bots?variant=13702307972 20 at $110) OR
- battery holder (20 at $1 – $20)
- motors (20 at $2 – $40)
- Alligator clips (50 for $11)
- cups
- (note – the difference between the kits and the separate components is $40 meaning $2 more per learner. The kits offer lots of add ons – gears, dowels meaning)
- Paper Circuits
- coin batteries (purchased quantity under Gami-bots)
- 5 MM LED lights (purchased quantity under Squishy Circuits
- copper tape (2 rolls of 1/8″ x 55 yd – $15)
- Minecraft Blocks and Dollhouses
- Cardstock (150 sheet pack from Walmart – $5.50)
- Miscellaneous Supplies (found at school)
- Tape
- Two sided tape
- Scissors
- Paper
- Butcher Block Paper
- Markers
The total budget for serving 20 kids for 2.5 hours per day for 5 days was about $450 noting that the games and kits ($200 of the money) used to kick-off the camp were one time purchases. They will be used again for future camps. It ended up being $22 for each camper for the entire week – $12.50 without the games or kits. Having a materials fee; or doing DonorsChoose.org or a fundraiser can easily cover these costs.
What follows are descriptions and how-tos for the circuit activities at did at this maker camp.
Introduction to Circuits with Games and Manipulatives
To introduce learners to circuits, they played with:
- Snap Circuits (2 stations)
- Circuit Maze (3 stations)
- Online Game: The Fusebox
- Online Game: The blobz Guide to Electric Circuits
For the first morning, I set up stations for each of the above. Learners were asked to work with a partner or two. They moved to any station at any time as long as they spent time finishing several projects at a given station.
Squishy Circuits
Squishy Circuits uses conductive and insulating play dough to teach the basics of electrical circuits in a fun, hands-on way. There’s no need for breadboards or soldering – just add batteries and pre-made doughs (or make your own dough). Squishy Circuits are very simple and is based on two play doughs – one that is conductive (electricity flows through it) and one that is insulative (does not allow electricity to flow through it). Power is supplied by a 4AA battery pack and travels through the conductive dough to provide power to LEDs (Light Emitting Diodes), buzzers, or motors. https://squishycircuits.com/what-is-squishy-circuits/
This PDF was shared with the makers campers: Squishy Circuits Introduction PDF. It provides some background and simple get started activities.
I then project resources on the Whiteboard to spark ideas for creative use of Squishing Circuits: http://www.pearltrees.com/jackiegerstein/squishy-circuits/id15355392squishy
Gami-Bots
A Gami-Bot is a simple DIY origami robot that is made from a vibration motor, business card, 3v cell battery, and tape. It is so easy it practically builds itself (https://otherlab.com/blog/post/howtoons-gami-bot).
This was developed by Howtoons. They now sell it as a kit but I buy all of the materials separately as they are simple materials and easily accessible.
Directions can be found via this Howtoons cartoon:
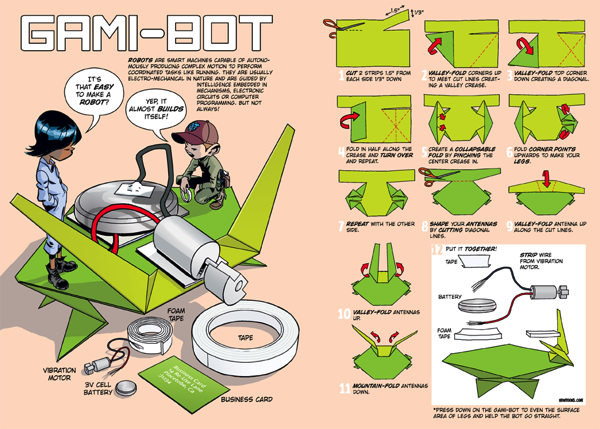
This is a high engagement, low entry activity for both younger and older (like adults) learners. I encourage learners to decorate them to make them more anthropomorphic and to engage in free play after their creation which often translates into competitions such as racing and length of time staying in determined area.
Wiggle and Art Bots
As this was a summer camp with a budget, my “big” purchase for this camp was Wiggle Bots bought from TeachGeek , but with a few parts like 3v motors, AA batteries, AA battery holders, plastic cups, markers, and tape, learners can easily make their own wiggle and art bots. See my page of resources on Artbots and Scribbling Machines at http://www.makereducation.com/artbots–scribbling-machines.html
LED Paper Projects
The last two days of camp were spent making LED projects:
- Minecraft Blocks
- Paper Circuits
- Circuit City
Minecraft Blocks
I printed off paper templates for Minecraft Blocks from http://stlmotherhood.com/diy-minecraft-light-blocks-diamond-emerald-redstone/. (Yes, it requires a color copier which all of the schools where I work [including the Title 1 ones) have.) Campers were instructed to cut them out and hole punch out “windows” in their blocks to allow the light to shine out. After assembling their blocks leaving the top open, they inserted LED lights with coin batteries taped into place.
http://www.technologystudent.com/elec_flsh/button1.html
Paper Circuits
I printed off the the parallel and switch circuit templates found at paper-circuit-project-templates. I printed them in color but black and write would have been fine. Additional materials for this project were LEDs, copper tape, and coin batteries. The templates are pretty self-explanatory so I walked around and gave the campers assisted when needed.
Circuit City
Finally, learners were given templates for paper house structures (https://www.template.net/business/paper-templates/paper-house-template/ – I encouraged campers to add lit LEDs as they did for their Minecraft blocks. They were asked to also use their Minecraft blocks and their paper circuits as part of the city. The miscellaneous materials (craft sticks, straws) were also available for them to use. A large piece of butcher block paper was placed on the floor and the learners were given the following simple directions, “Create a city out of your paper crafts: your houses, Minecraft blocks, and paper circuits. You can use the extra LED/coin batteries and markers to add to your city.” Once their city was complete, I darkened the room.
This is the second time I’ve done this activity, and both times, I observed the campers having lots of fun doing some spontaneous role play interacting with the city and each other.


Leave a comment