A laptop can do far more than you might imagine and, crucially, that can mean making your life easier in many ways.
This guide focuses on Windows and macOS laptop operating systems with tips and tricks that can help you get the most out of your machine. From helpful shortcuts to customization that makes life easier, these tips should assist.
These are all laid out in sections so you can select one along the top to jump right to it, or scroll through and see which could serve you in your classroom.
If you're looking for Chromebook specific guidance, then this guide may suit your needs better.
Best Things Your Laptop Can Do
Use dark mode
Dark mode is a relatively recent feature that has been added as a way to both go easier on your eyes and also save on battery life. The idea is that by using more dark rather than white on your display, the screen will use far less battery to light the area. That should also mean it's gentler on your eyes, allowing you to work for longer without it being quite so visually intense.
This is now available both on Windows and macOS machines.
Windows
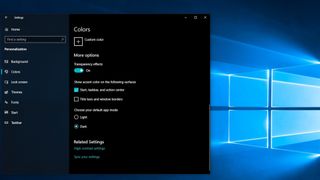
To turn on dark mode in Windows simply navigate to Settings, Personalization, Colors, then select Dark.
Mac
Using macOS you'll need to navigate to the Apple menu, System Settings, then Appearance in the sidebar before selecting Dark or Auto on the right.

Slide to shut down Windows
One very easy-to-use feature, that makes shutting down your Windows machine faster, is the slide to shut down option. This is pretty cool as you can go from working on your machine to having it fully powered down in a single swipe of the touchscreen display.
This does mean a little coding is needed but just follow this guidance and it's relatively easy.
Right-click your desktop and select New then Shortcut. Copy and paste this code into the text box: %windir%\System32\SlideToShutDown.exe
Select Next, name the file something such as SlideToShutDown, and select Finish.
There should now be an icon on your homescreen. Right-click this and select Properties and under the shortcut tab select Change Icon and OK. Pick an icon you want to use and select OK, Apply, and OK.
Now all you need to do is open that icon and initiate the swipe shutdown feature.
Use Focus mode
One really useful feature that helps you stay productive is Focus mode, and its various other options. This essentially limits the number of distracting interruptions that might stop you from working on whatever you need to get done. Perhaps you're working on a slide presentation and don't need email alerts bothering you -- this Focus option will keep any hidden until you're down and change the mode again.
Windows
For a Windows machine you'll need to go to Start, Settings, System, and Focus Assist, where you'll then be able to tweak how you are alerted or left alone based on what you need.
Mac
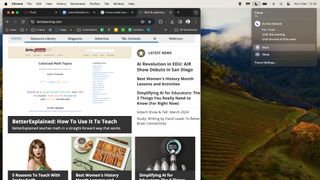
To turn on or setup Focus modes on macOS, simply select the crescent moon icon at the top-right menu bar and pick the mode you want. This lets you pick how long you want Focus to stay on, or allows you to use other modes such as Work or Sleep, which you can customize by selecting the Focus Settings at the bottom. Crucially, this will work across your Apple devices, so your phone, watch, and tablet will also be put into that mode.
Pin websites to taskbar
Did you know it's possible to pin a website to your taskbar in Windows? And that you can do it in macOS too? In both cases it allows you to get right back to a website by clicking the icon link from your home screen. This is great if you're compiling research, or perhaps want to have a site ready to quick-access when presenting to the class.
Windows
On a Windows machine, the easiest way to do this is from the Edge browser in which you simply open the main browser menu using the three dots at the top-right, then select More tools and Pin to taskbar.
Mac
On macOS this can be done in Safari or Chrome by simply dragging down the URL from the address bar to the right-hand side of the dock.

Edit screenshots
A really quick way to take something from any app or website and make an edit is to annotate a screenshot. Yup, you can take a snap of anything on your display and immediately add an edit. From popping in text, circling something, or highlighting text, there are lots of helpful options available.
Windows
On Windows use the shortcut Win + Shift + S to image grab before clicking the thumbnail to add annotations.
Mac
To do this on a macOS machine use the shortcut keys Command + Shift + 5 to use a floating select tool before hitting Capture. You can then edit using the pen icon before hitting done to save.
Copy and paste between devices
Copy and paste is one of those features that you probably use without even thinking about it, or appreciating just how helpful it is. Now you can use it between devices, which makes it even more powerful as a time-saving tool. This is limited to same OS devices though, so you'll either being going between Windows or Apple devices, not across the two.
Windows
On a Windows machine go to the Windows Settings, select System and Clipboard, which then syncs across devices using your Windows ID -- also allowing you to have multiple items on the clipboard at any time.
Mac
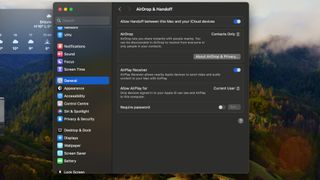
On an Apple device you simply need to make sure this mode is turned on. To do this in macOS, navigate to the Apple menu, System Settings, General, then Airdrop & Handoff, where you will want to have the handoff toggled on so you can copy in macOS and paste in iOS, for example.

Share with nearby devices
Both macOS machines and Windows laptops makes wireless sharing easy. That can mean sharing slide decks, images, videos, links, and plenty more, all without the need to send over the internet or connect using physical hardware. In both these cases you will be able to use Bluetooth and wifi direct to send even larger files quickly.
Windows
For a Windows machine you'll need to turn on Nearby Share for this to work. Go into the Start menu, select Nearby Share settings and toggle to Share content. Then right-click what you want and select Share to pick another device from the pop up list and click the one you want to get sending.
Mac
On a Mac you can do this using AirDrop, which appears in the top right when you select the control center icon and then the right arrow near AirDrop. With this on, you can right-click almost any file and have the option to look for nearby contacts to share with.

