Day of the Dead (Dia de los Muertos) Displays: A Maker Education Project
I have lived in Santa Fe, New Mexico for a few decades. One of my favorite things about living here is that my town celebrates and embraces Hispanic and Mexican cultural traditions. I have the privilege of working with gifted kids at two elementary schools with over 80% Hispanic students. For the past two years, I did Halloween Wars – based off of the Food Channel show. See Halloween Wars: An Interdisciplinary Lesson with a STEM, STEAM, Maker Education Focus for more about this. Because of the cultural heritage of my students and because I find the Day of the Dead holiday so intriguing and beautiful (the movie, Coco, helped bring its beauty to the masses), I decided to focus on having the students create Dia de los Muertos displays this year.
Standards Addressed
21st Century Skills
- Using 21st century skills to understand and address global issues
- Learning from and working collaboratively with individuals representing diverse cultures, religions and lifestyles in a spirit of mutual respect and open dialogue in personal, work and community contexts
- Understanding other nations and cultures, including the use of non-English languages
- Create new and worthwhile ideas (both incremental and radical concepts)
- Elaborate, refine, analyze and evaluate their own ideas in order to improve and maximize creative efforts
- Create new and worthwhile ideas (both incremental and radical concepts)
- Elaborate, refine, analyze and evaluate their own ideas in order to improve and maximize creative efforts
Next Generation Science Standards
- Define a simple design problem reflecting a need or a want that includes specified criteria for success and constraints on materials, time, or cost.
- Evaluate competing design solutions using a systematic process to determine how well they meet the criteria and constraints of the problem.
- Analyze and interpret data on the properties of substances before and after the substances interact to determine if a chemical reaction has occurred.
Common Core State Standards – ELA
- Write narratives to develop real or imagined experiences or events using effective technique, relevant descriptive details, and well-structured event sequences.
Getting Started – Gaining Attention
To introduce and show students the traditions related to Day of the Dead, they are shown the following videos:
-
Day of the Dead- Flavor and Tradition – https://www.youtube.com/watch?v=rdlL45ljkEY
-
What is Day of the Dead? | National Geographic – https://youtu.be/_sSawpU81cI
-
Dia de los Muertos (short film) – https://youtu.be/-v4-1wFEzM0
. . . as well as given time to explore the Smithsonian Latino Center’s Theater of the Dead – http://latino.si.edu/dayofthedead/ which includes an interactive element to build their own alter or Ofrenda.
Writing a Story About Day of the Dead
Students write a story with a Day of the Dead theme. They are given the option to write it alone or with a partner. Here is an example from one of my 6th grade students:
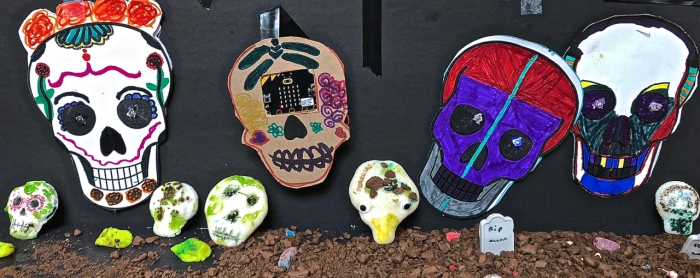
Artifacts for the Day of the Dead Displays
Students make the following artifacts and then, in small groups of three students, decide if and how they want to use them in their Day of the Dead displays to reflect the stories they wrote.
Decorated Skulls with Paper Circuits for Eyes
Materials: skull outline and parallel circuit outline (one for each student), 5MM LED lights, copper tape, coin batteries, transparent tape, markers.
Students decorate their paper skulls and then make parallel paper circuits to light up the eyes of these skulls. I found a template of a skeleton skull online. I printed these out – one for each student. I then made an outline of a parallel circuit so that when connected and joined with the top part, the LEDs would show up as pupils of the decorated skull – see below.
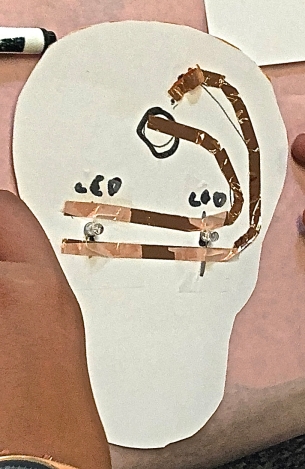

Students first cut out and decorate their skulls with markers. Images of decorated Day of the Dead skulls can be projected via a whiteboard so students can see examples. They then trace their cut out skulls onto the paper circuits template and cut that out. The bottom piece, containing the parallel circuit design, is then wired with the copper tape. The shorter copper tape is taped down from the battery placeholder to the end of its outline, so that the coin battery can be placed on top of that. For the longer piece of copper tape, about 1.5 inches is left at the end near the battery. This extra is folded onto itself so that after the battery is in place, this part of the copper tape can be taped on top of the battery. Having a folded over end piece makes it more manageable. Students should be reminded how to find the polarities of both the LEDs (the longer leg is positive) and the coin battery (it has a + on the top – that side with a little bit larger diameter). Students then tape their batteries and LEDs in place insuring that the positive legs of the LED lead to positive side of the battery and visa-versa. For more about paper circuits, see https://www.makerspaces.com/paper-circuits/. The LEDs are then poked through the eyes of the decorated skull. The top and bottom pieces are then stapled together.
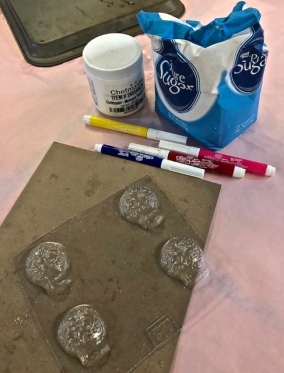
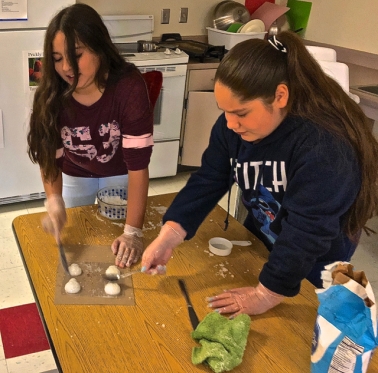
Sugar Skulls
Materials: sugar, meringue powder, sugar skull molds
Sugar skull molds can be purchased from https://www.mexicansugarskull.com/sugar_skulls/sugar-skull-molds.html. Sugar skulls are incredibly easy to make – just combining the dry ingredients of sugar and meringue power and adding a little water so it becomes the consistency of dampened beach sand. More directions along with amounts can be found at https://www.mexicansugarskull.com/sugar_skulls/instructions.html. After waiting at least 24 hours for the skulls to harden, students can then decorate them using edible markers or royal icing.
Skulls from Modeling Chocolate
Materials: white chocolate morsels, corn syrup.
This is another easy recipe to make (see http://artisancakecompany.com/recipe/how-to-make-perfect-modeling-chocolate/ for specific directions) although it is a bit tricky to get the modeling chocolate to the right consistency. Once the modeling chocolate is made, students sculpt it into 3D skulls.


micro:bit Lit Skull
Materials: micro:bit (one for each team), heavy stock cardboard, (servos with jumper wires and alligator clips if movement is designed)
A micro:bit is mini-computer, half the size of a credit card equipped with 25 red LED lights that can flash messages. The micro:bit features an embedded compass, accelerometer, mobile, and web-based programming capabilities. It is compatible with a number of online code editors across a number of different languages (https://learn.sparkfun.com/tutorials/getting-started-with-the-microbit). For this activity, students cut out a skull with a window in the middle for the micro:bit (see below). They then use https://makecode.microbit.org/ to (1) create a message on the LEDs about Day of the Dead, and (2) code the servo to rotate the skull in a small arc from side to side (see https://sites.google.com/view/microbitofthings/7-motor-control/11-servo-control?authuser=0 for how to do this).


Tissue Paper Marigolds


Materials: yellow tissue paper, pipe cleaners.
The directions for how to make these can be found at https://tinkerlab.com/simple-paper-marigolds-dia-de-los-muertos/,
Edible Slime
Materials: sugar free Jello, starch
This is an easy recipe with the slime made by combining sugar free Jello, food starch, and water. Colors are determined by the flavor of the Jello – I like using lime for green slime and strawberry for red slime. For more information, visit https://thesoccermomblog.com/edible-silly-putty/
Miscellaneous Materials
Students are provided with core board and also given candy bones, candy gravestones, and chocolate animal crackers (to be crushed into dirt) so that these items along with the projects described above can be used for their displays, again reminding students that the displays should directly reflect their stories about Dead of the Day – Dia de los Muertos.
Student Reflection
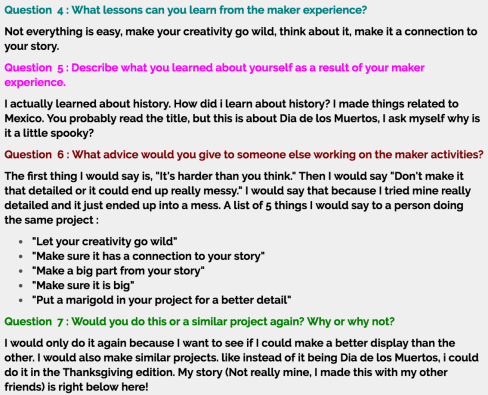
Students were asked to randomly choose five cards from the deck of my Maker Reflection Cards to reflect on their experiences with this project. They were told that they could discard two of them but would need to answer three of them via a blog post, and I was totally elated when one asked if he could answer more – seven of them! Here are screenshots of his and another student’s reflections.


Fabulous, I love the interdisciplinary approach! Thank you for providing standards alignment and links to all the resources required for the project.
Lori
November 8, 2018 at 3:17 pm