

Somehow, we’ve already reached the “Back to School” season and soon will be welcoming a new school year. Luckily, you have a great set of resources within Apple School Manager and Jamf Pro to streamline device rollouts and app distribution to returning and new students and teachers.
Apple School Manager offers a one-stop-shop for purchasing apps and books for distribution, integrating with data from a student information system (SIS), creating Managed Apple IDs, and connecting to mobile device management (MDM) for a streamlined way to deploy devices and content. It is easy to get started at https://school.apple.com.
After establishing an account with Apple School Manager, you can tie the account to Jamf Pro to leverage the power of MDM.
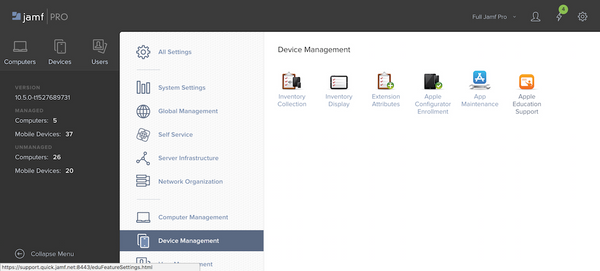
Integrating with Apple School Manager and enabling Apple Education Support
To enable Apple Education Support and take advantage of the benefits of Apple School Manager, such as Classroom and Managed Apple IDs, you’ll navigate to Settings > Device Management > Apple Education Support.
Next, you’ll edit the settings to Enable Apple Education Support. This option turns on the settings needed for using Managed Apple IDs, importing classes and users, and individual profiles needed when assign students to classes.
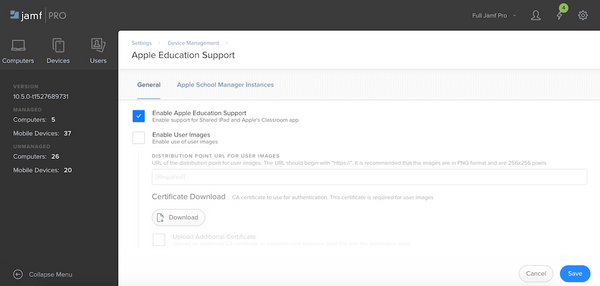
After clicking the box to Enable Apple Education Support, you’ll then select the Enable Apple School Manager Integration box under the Apple School Manager Instances tab. After checking the box, you’ll select the Add button.
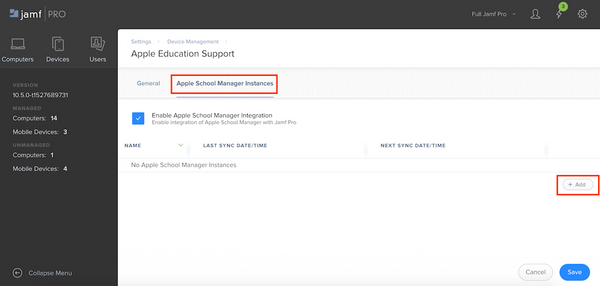
You’ll be asked to provide a display name for the instance, select the DEP instance, and select a preferred sync time with Apple School Manager. To see how to integrate with DEP, check out this video.
After the initial integration, Apple School Manager and Jamf Pro will sync in the next 24 hours and again at the preferred sync time daily. You can also select Force Sync to make this happen sooner. Note: Force Sync merely starts the sync process; depending on the amount of data, the sync may not complete immediately.
Next, you can start importing users and classes.
Importing users and classes
When importing users and classes, take some time to consider where and how the existing class and user data is located and organized.
- Are we integrating with a SIS?
- What usernames do we currently use for users?
- Do we have users in LDAP to associate devices to users?
- If not, you can use the JSS MUT to upload users to device records.
When integrating with Apple School Manager, you’ll need to select a “Class Naming Format”. When a class is imported, the variables are applied to the display name of the class in the order selected. For example, if you select "Course Name" and "Class Source ID", the class is imported to the Jamf Pro Server with a name like "Biology12345".
If a value is not available in Apple School Manager for the variable selected in the Jamf Pro server, a blank value is displayed for that selected variable in the class name. When importing classes, we recommend importing one class as a test to verify that information is importing and displaying as desired before importing additional classes.
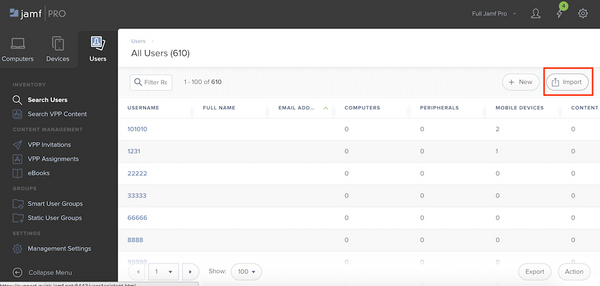
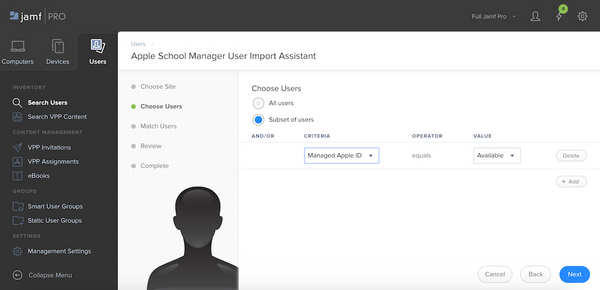
There are two ways to import users into Jamf Pro from Apple School Manager — via the Users tab or via Classes, under Mobile Devices. We recommend importing via Users in order to verify the import.
By navigating to Users > Search Users and doing a blank search, you can then click “Import”.
You’ll have the option to assign users to a site and decide to import all users or a subset based on Managed Apple ID, Class Name, Course Name or Grade. You then have the option to match the incoming users to existing users in Jamf Pro or create a new user record. In most cases, you’ll want to match the users.
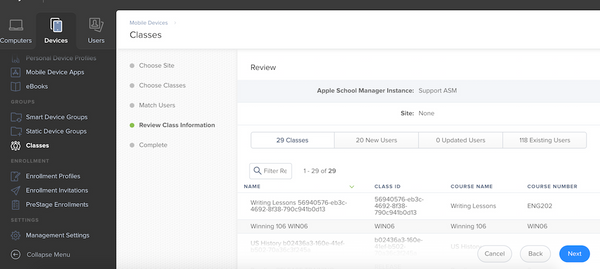
During review process, you’ll see the number of new users being imported, updated users that were matched, and existing users that were already imported from Apple School Manger. If these numbers seem off (for example, all users should be updated and existing or all users should be new), investigate the matching criteria being used and verify that the field in Jamf Pro matches the field in Apple School Manager for a user being imported. It is better to take time on this step to avoid having to remove incorrect user records and start the import over.
To import Classes, navigate to Devices, then Classes and select “Import”.
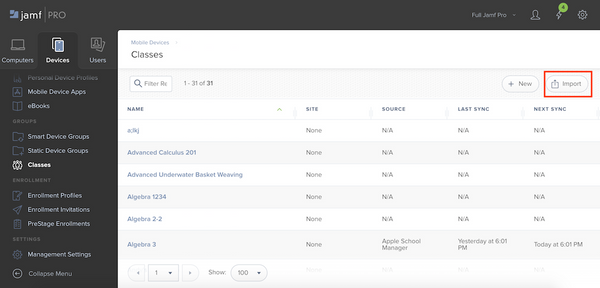
Choose the classes to be imported from Apple School Manager, then repeat the steps for matching users if there are any changes or additions from the user import. Importing classes will take more time than an import of just users.
One question:
Since students can sometimes be added or removed to a class roster at anytime, what happens to the class rosters in Jamf Pro if this happens?
The sync with Apple School Manager will find changes to class rosters IF the user already exists. Otherwise the user will have to be added via an additional user import. Additionally, the sync will update roster information for an existing user if it has changed within Apple School Manager, but will not update “General" information for the user record in Jamf Pro.
Shared iPads and Managed IDs
In addition to importing class and student data to use with Classroom app, Apple School Manager can also be used to set up Shared iPads and Managed Apple IDs.
Shared iPad is a newer feature of iPads and Apple School Manager. Shared iPad should be distinguished from a legacy method of deployment using Apple Configurator and carts of devices, which is still a support methodology.
However, Shared iPad setup through DEP can set up an iPad to have multiple users. In this case, the device is shared but user data is not. Shared iPads can support multiple users, but there are limits on the number of users based on the hardware and storage space being used. When considering setting up Shared iPads it is important to review the capabilities and requirements from Apple.
Each user can be issued a Managed Apple ID for use with Shared iPads in order to receive apps and books. When using device-based app deployment, Apple IDs are not required but eBooks can only be distributed to Apple IDs. Managed Apple IDs are different than a typical Apple ID and are generated with Apple School Manager. They are institutionally owned, so the account can be restricted more than a regular Apple ID.
Apple School Manager makes it easy to create a unique Managed Apple ID for each person in bulk either by importing from SIS or CSV files using the Secure File Transport Protocol (SFTP). Accounts can also be generated manually with Apple School Manager.
To set up Shared iPads, you want to create a new PreStage Enrollment and enable Shared iPads under the checkbox for Supervision, select the number of users per device, and update the scope to include devices that you wish to have set up as Shared iPad.
Migrating to Apps and Books
Deploying devices and managing classes is a major part of fall rollouts, but what about app distribution? Within Apple School Manager, you can now also organize content purchases from the Volume Purchasing Program (VPP) — now simply called Apps and Books. Apps and Books is an enhancement within Apple School Manager for VPP, allowing one organization to have multiple tokens under one Apple School Manager account.
Each VPP account can be migrated from a legacy token to the new location token within Apple School Manager. Organizations should map each purchaser to a unique location to ensure that all licenses (assigned and unassigned) are automatically moved during the initial migration.
It is recommended that all content managers are moved at the same time. This can be done by each content manager, or by an administrator with access to all accounts.
To start, you need to create a location to associate apps and books content. If needed, you can create multiple locations. To create a location, you need to be logged into Apple School Manager with an account with permissions to create locations.
Next, you can get started with Apps and Books and follow the prompts. In order to get started, select the Location that was just created and click “Okay”. Once Apps and Books is configured, you can search for apps or books within the Apps and Books tab — much like you would through the App Store or through the VPP portal — in order to purchase licenses.
Apple School Manager allows for the transfer of licenses from one location to another. This is especially handy if one location needs additional licenses or an incorrect purchase was made to the wrong location.
To learn more about how to use Apple School Manager with Jamf Pro, check our Customer Success Series: Ring in the School Year with Apple School Manager video.
Not already a Jamf customer? Take our best-of-breed Apple management solution for a free test drive and start putting these workflows in place.
by Category:
Have market trends, Apple updates and Jamf news delivered directly to your inbox.
To learn more about how we collect, use, disclose, transfer, and store your information, please visit our Privacy Policy.